Getting started, step by step
This guide is for people who have never used a command line or a self-hosted tool. It takes about 15 minutes. If you get stuck, jump to Troubleshooting.
Delistd runs on your own computer and has no server of ours. Where your data goes:
- Your email provider (Gmail, etc.): receives the emails Delistd sends and lets it read replies, using your app password.
- The data brokers: receive your removal requests, which contain your name and any details you entered. That is the point of the tool. Opt-out forms and confirmation links also open broker websites.
- GitHub: only if you click “update broker list” (or run
delistd update-brokers), and then Delistd downloads a public file. None of your details are sent. - Your AI agent: only if you turn on the experimental MCP feature.
Nothing goes to the Delistd project, and there is no tracking or telemetry.
Before you start
You need:
- A computer running macOS, Windows or Linux. Delistd is not a phone app.
- An email address you are happy to send from (Gmail, iCloud, Fastmail and others work). Delistd sends each removal request from it, so brokers’ replies land in your inbox.
- Your name and, if you want brokers to find you reliably, your postal address.
You do not need to know how to code.
Step 1: Decide how emails get sent
Delistd can send the emails for you or hand them to you to send yourself. Pick one now, because it decides what you enter later.
| Delistd sends them | You send them yourself | |
|---|---|---|
| Setup | One extra step: create an app password (below) | Nothing to set up |
| Password given to Delistd | An app password, not your real one | None |
| Effort per broker | None, fully automatic | Open, review and send each email by hand |
| Good for | Most people | People who won’t give any tool email access |
If you choose “send them yourself”, skip ahead to Step 5 and pick the Skip option on the email page. See Sending by hand for how that works.
Step 2: Get an app password (Gmail)
Many people ask: “Do I have to enter my Google password?” No. Delistd asks for an app password, a separate 16-character password Google generates for one app. It can send and read mail only, you can delete it at any time, and your real Google password stays private.
Delistd does not use “Sign in with Google” (OAuth). Google requires an app review for that, which a self-hosted, open-source tool cannot reasonably pass. An app password is the supported alternative.
- Go to myaccount.google.com/security and sign in.
- Find 2-Step Verification. If it says Off, turn it on and follow the prompts (a phone number or authenticator app is fine). App passwords are not available without it.
- Open myaccount.google.com/apppasswords. If the page says the setting “isn’t available for your account”, see Troubleshooting.
- Type a name such as
Delistdand click Create. - Google shows a 16-character password in a yellow box, like
abcd efgh ijkl mnop. Copy it now. Google will not show it again. Spaces don’t matter when you paste it into Delistd.
Keep that window open or paste the password somewhere temporary until Step 5.
Using another provider? The provider table in the README lists what each one needs (iCloud and Fastmail also use app passwords; Proton Mail needs its Bridge app).
Step 3: Download Delistd
Pick the line that matches your computer.
macOS or Linux with Homebrew (open the Terminal app and paste these two lines):
brew tap drumandbytes/tap
brew install --cask drumandbytes/tap/delistd
Windows, or macOS/Linux without Homebrew:
- Open the Releases page.
- Under Assets, download the file for your system:
- Windows: the file ending in
_windows_amd64.exe(for exampledelistd_2.0.1_windows_amd64.exe) - Mac with Apple chip (M1 or newer):
_darwin_arm64.tar.gz - Mac with Intel chip:
_darwin_amd64.tar.gz - Linux:
_linux_amd64.tar.gz(or_arm64on ARM)
- Windows: the file ending in
- Put it somewhere easy to find, such as your Downloads folder. On a Mac or Linux, double-click the
.tar.gzto unpack it.
Not sure which Mac you have? Apple menu > About This Mac: “Chip: Apple M…” means Apple chip, “Processor: Intel” means Intel.
Windows may show a blue “Windows protected your PC” screen the first time because the file is not code-signed. Click More info, then Run anyway. On a Mac, if it says the app can’t be opened, see Troubleshooting.
Step 4: Start Delistd
Windows: double-click the .exe you downloaded. A black window opens and your browser opens Delistd. Leave the black window open: closing it stops Delistd.
macOS (downloaded file): double-click the unpacked delistd file. Terminal opens and your browser opens Delistd. If macOS refuses, see Troubleshooting.
macOS or Linux with Homebrew: open the Terminal app (press Cmd+Space, type Terminal, press Enter), type delistd and press Enter.
Linux (downloaded file): open a terminal in the folder with the file and run ./delistd.
If your browser doesn’t open by itself, open http://localhost:8080. This address only works on your own computer. To use a different port, run delistd serve -p 3000 instead.
Step 5: Run the setup wizard
The page walks you through three screens.
1. Welcome. Click Get Started.
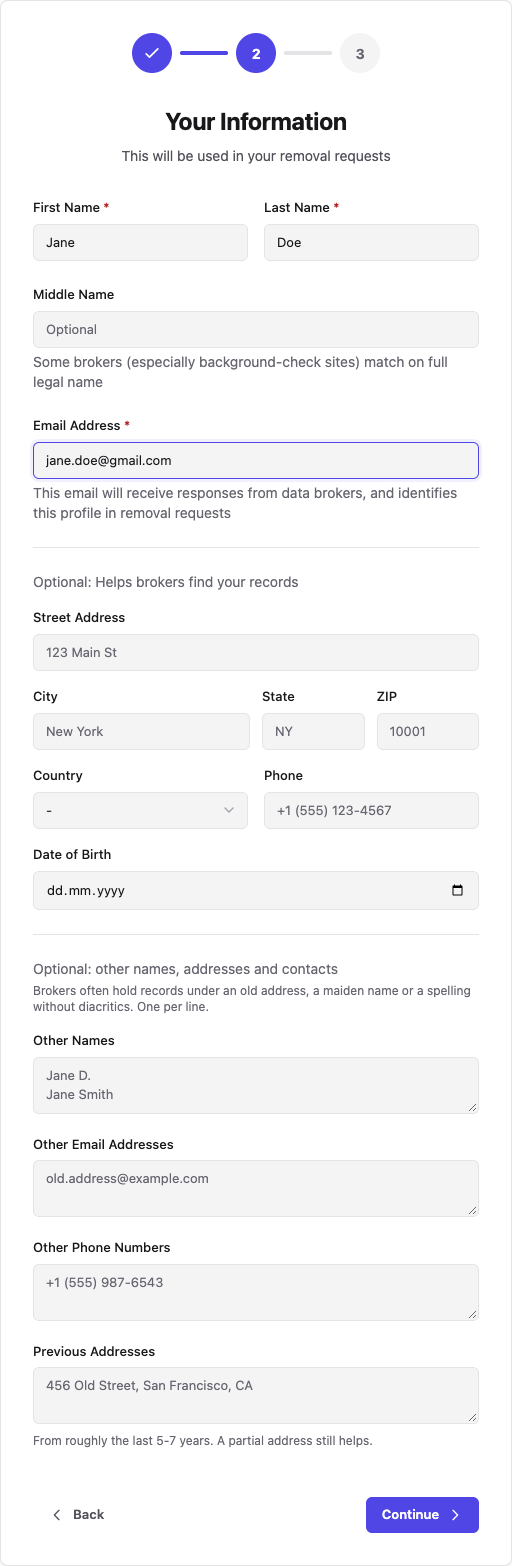
2. Your Information. Enter your name, email address and, ideally, your address and country. Brokers match requests to records using these, so the more accurate they are, the more records get found. This stays on your computer. Optional fields (phone, date of birth, former names) help but are not required.
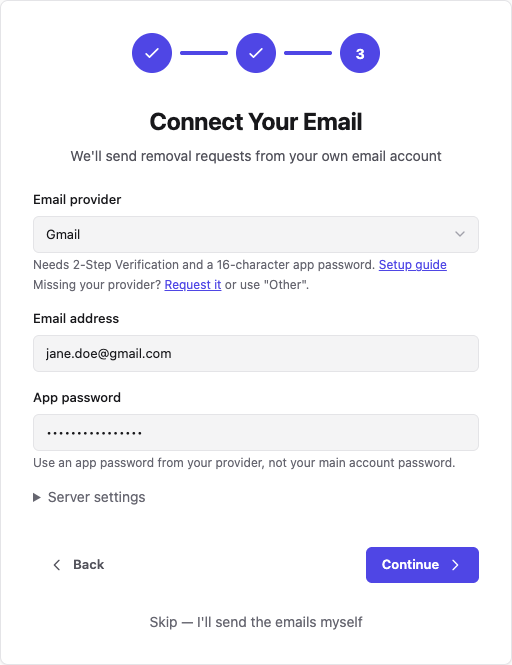
3. Connect Your Email.
- Email provider: choose Gmail (or yours). The server settings fill in automatically. Ignore the Server settings drop-down.
- Email address: your Gmail address.
- App password: paste the 16-character code from Step 2.
- Click Continue.
To send by hand instead, click Skip — I’ll send the emails myself under the Continue button and leave the fields empty.
Delistd then offers to send a test email to yourself. Click it, check your inbox (and spam folder), and continue. If the test fails, see Troubleshooting.
Step 6: Send your first requests
- Open Brokers in the top menu.
- Click Send to All. Delistd sends up to 450 emails per day (just under Gmail’s limit) and continues on the next run until every broker has been contacted.
- Leave it be for a few days. The Dashboard shows who replied and what needs you.
Some brokers answer with a link to click or a form to fill in. Delistd lists these on the Pipeline page, so you can see what needs you. Broker replies explains what each reply type means.
Brokers re-list people over time, so repeat every few weeks. To have Delistd do that automatically, open Settings > Automation and install the schedule.
Sending by hand
With the Skip option chosen, Delistd never sends anything. On the Brokers page each broker has an Email link showing the ready-to-send message with an Open in mail app button. Send it from your normal mail app, then press Mark sent so Delistd tracks it. It is slower for 700+ brokers, so many people use it for a handful of important ones and let Delistd send the rest.
Troubleshooting
“App passwords” page says it isn’t available. Google hides it when 2-Step Verification is off, for accounts in Advanced Protection, and for many work or school (Google Workspace) accounts where the administrator turned it off. Fix: turn on 2-Step Verification, or use a personal Gmail address, or use the Skip option and send by hand.
The test email fails with “authentication failed” or “username and password not accepted”. The app password was typed wrongly or revoked. Create a new one in Step 2 and paste it again under Settings. Use the app password, not your Google password.
The test email never arrives. Check spam. Then check your Gmail Sent folder: if it is there, the send worked.
macOS: “can’t be opened because Apple cannot check it for malicious software”. The file is unsigned. Either right-click it, choose Open, then Open again, or run this once in Terminal from the folder holding the file:
xattr -dr com.apple.quarantine ./delistd
localhost:8080 doesn’t load. Make sure the black or Terminal window from Step 4 is still open. If another program uses port 8080, run delistd serve -p 3000 and visit http://localhost:3000.
I closed the window and Delistd stopped. Start it again as in Step 4. Your settings and history are saved and come back.
I’d rather not leave a window open. Use Settings > Automation to have your computer run Delistd on a schedule in the background.
Still stuck? Open an issue and say which step failed and what the screen showed. Never paste your app password into an issue.
What next
- broker-replies.md: what to do with each kind of response
- multi-profile.md: sending for a partner or relative as well
- commands.md: the full command and settings reference for when you want more control